
High-Angle Photography Tips for Urban Landscapes
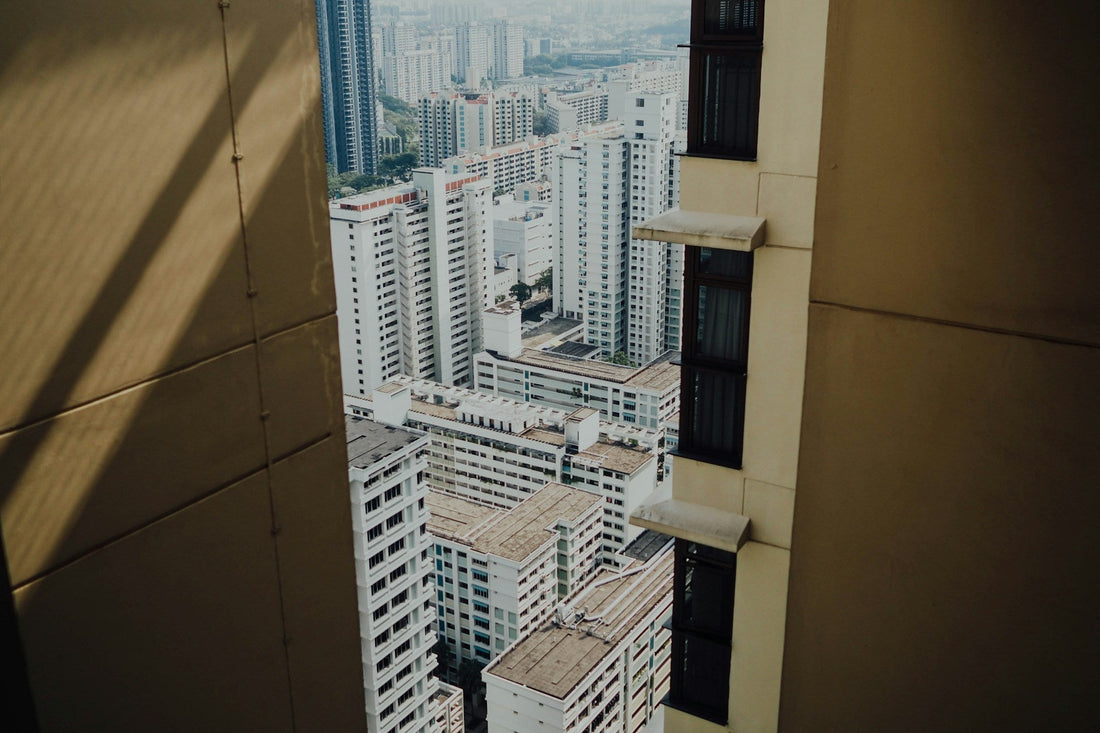
Urban landscapes offer something few other settings can — a mix of height, geometry, and motion all packed into one view. From towering office buildings to busy crosswalks, there's a lot to take in. High-angle photography lets you see it from an entirely different perspective. Looking down on a city can reveal patterns, balance, and stories that get lost when you're standing at ground level. Whether it's the symmetry of a plaza or the curve of a freeway ramp cutting across a skyline, those elevated shots can turn everyday sights into artwork.
Still, snapping those views comes with challenges. Finding the right gear, mastering angles, or even just figuring out where to shoot from can take a bit of trial and error. Having the right equipment helps. A strong, tall tripod, for example, gives you the stability and height you need without climbing stairs or rooftops. Getting those really clean shots takes a mix of planning and the right setup. If you're aiming for more impact from your city photos, especially from above, starting with the right equipment can make all the difference.
Choosing The Right Equipment For High-Angle Shots
Getting your camera higher up opens the shot, but it also increases the room for movement or blur. That’s where a tall tripod steps in. Not just any tripod will do. Urban photography needs something that’s easy to transport but still strong enough to stay put once it's set. If your gear slides around or shifts angles mid-shot, that’s a moment missed.
When looking for the best tall tripods for photographers, here are a few features to keep in mind:
- Height Range: Find a tripod that can extend above eye level while maintaining control. The extra height helps you capture rooftops, over fences, or busy intersections.
- Stability: Lightweight options are great for travel, but the model must remain steady once placed. A little shake can ruin a detailed shot or long exposure.
- Locking System: Whether it's twist locks or lever systems, the legs should stay tight when fully extended. Avoid anything that slips under weight.
- Weight Support: Cameras with long lenses or full-frame bodies need more support. Choose a tripod that won’t tip when fully rigged.
- Base Footing: Rubber feet are good for indoor spaces or sidewalks. For rougher terrain, look for adjustable or spiked ends for better hold.
More than just the tripod, there are a few accessories worth having in your kit. A wireless remote cuts out camera shake when pressing the shutter. Spare mounting plates make fast repositioning easier if you're switching angles on-site. Sandbags or counterweights are helpful in windy spots to keep your gear grounded.
With the right tripod and accessories, you get reliable height and steady framing. This kind of setup gives you flexibility, even on uneven ground, and lets you focus more on the shot without juggling technical issues once the camera is up and running.
Optimizing Composition And Angles
Now that your setup is solid, it’s time to think about how to frame the shot. Higher angles don’t just give you a different look — they let you showcase depth, symmetry, and scale. Whether standing on a balcony or setting up on a parking structure, these elevated views make everyday city scenes more detailed and layered.
Look for safe, accessible spots that naturally offer good height. Public ramps, overpasses, rooftops with permission, or open staircases are often top picks. Once you’re in place, move slowly. Take test shots, zoom in and out, adjust focus, and see where the light and structure come together.
Some helpful ideas to structure a high-angle urban shot:
- Leading Lines: Use railings, sidewalks, or streets to draw the viewer's eye through the frame. These lines create direction and make scenes feel organized.
- Shapes and Patterns: From above, architecture reveals geometric forms not visible from the ground. Look for patterns from buildings, trees, or cars that fill the space creatively.
- Subject Placement: The subject doesn’t need to be centered. Off-center shots often give better balance and leave room for surroundings to add context or mood.
Take multiple images and watch the scene evolve. Sometimes it’s a detail like a colorful umbrella moving through the shot or someone walking across a painted crosswalk that turns an average photo into a memorable one. It’s about being ready for that unscripted element to pass through your frame.
Having the gear makes it easier to change position without disturbing your angle. And the more you experiment with where you shoot from, the more confident you’ll get with adjusting timing, movement, and layout on the go.
Managing Lighting And Weather Conditions
Even when you’ve found the perfect spot and nailed the composition, the quality of light can change the outcome completely. In high-angle photography, lighting shifts can either expose the structure's beauty or flatten everything out. Timing the light, reading the weather, and prepping for sudden changes makes a noticeable difference.
Golden hour works well for tall buildings and soft shadows, while blue hour helps city lights shine with cool contrast. These narrow windows offer more even lighting in complex scenes with a lot of surface reflection. If you miss them, strong mid-day sun can wash out color or blow out details in brighter areas.
When weather doesn’t cooperate or changes fast, here are a few ways to stay ready:
- Use a remote shutter or delay timer—important during wind gusts to reduce motion blur.
- Pack rain covers and lens hoods to guard against moisture and glare.
- Keep your ISO low during daylight, but slightly increase it when skies dim, being careful to manage noise levels.
- Microfiber cloths should always be ready to clear off lenses after a drizzle or heavy breeze.
- Shoot in RAW format so you can recover more detail after the fact during editing.
Even if conditions aren't ideal, you can still end up with some strong images. Wet streets offer reflections, clouds soften shadows, and different moods emerge when the light isn’t perfect. The goal is to stay flexible and keep shooting through changes rather than calling it a day.
Practical Shooting Tips For Urban Landscapes
Once you’ve found the right height, setup, and lighting, the real fun begins — capturing the energy below without getting lost in the busy movement of the city. Urban photography at higher angles lets you tell visual stories with multiple layers. The trick comes from knowing when to shoot and how to use what’s happening in the frame.
Here are some shooting ideas that help breathe life into shots:
1. Use Long Exposures At Night
Lights from moving vehicles turn into streaks that show motion trails. They connect parts of the image with flow and energy not seen in daylight.
2. Frame For Story, Not Just Size
Small moments tell big stories. Look beyond skyscrapers. A person hailing a cab beneath a neon sign or a dog walker in a quiet alley can add interest and emotion.
3. Capture Layers Of Activity
Photograph during morning rush or lunchtime. More foot traffic, bikes, and cars add depth through layered movement in different corners of the frame.
4. Use Reflections And Mirrors
Try lining up shots so that mirrored buildings or water puddles echo your real subject. These visual echoes add dimension and often surprise viewers.
5. Stay Low ISO During Daylight
Unless you're shooting in deep shadow, keep ISO low for crisp details and minimal grain. Save ISO boosts for poor light or night energy.
A common method is setting up on a balcony or secure landing. With the tripod raised slightly higher than eye level, you clear foreground clutter and allow for more immersive frames. Movement from above looks slower and more graceful. Shifting light across building tops becomes more visible. Even waiting for a single colorful car or red umbrella to enter the frame can make a still scene come alive.
It’s about waiting patiently, watching patterns, and pressing the shutter at the moment everything lines up. Those intentional moves behind the lens give your work polish and meaning.
Why Elevated Equipment Makes a Difference
High-angle urban photography isn’t only about taller views. It’s about building space for creativity using tools that give control and clarity. Tall tripods and extension gear don’t just add height — they open new ways to work in tight spaces where stepping back or upward isn’t possible.
Whether you're filming an online lesson, inspecting rooftops for a real estate listing, or composing city streets as fine art, quality equipment improves each part of that process. From setup and safety to balance and movement, the outcome depends on the gear just as much as the eye behind the lens.
With options like telescoping masts, extension poles, and monopods designed for strength and portability, it’s easier than ever to get professional-quality images from places most people don’t think to shoot. When you combine thorough shooting techniques with dependable gear, your results show it. Clearer patterns, stronger compositions, and better consistency every time.
Ready to enhance your urban photography experience? Discover how using the best tall tripods for photographers can help you capture stunning high-angle shots with greater clarity and detail. Find the gear that fits your creative goals with Hi Rise Camera and take your shots to the next level.